DeepNVMe
本教程将展示如何使用 DeepNVMe 在持久存储和驻留在主机或设备内存中的张量之间进行数据传输。DeepNVMe 通过基于非易失性内存高速(NVMe)固态硬盘(SSD)、Linux 异步 I/O(libaio)和 NVIDIA Magnum IOTM GPUDirect® Storage(GDS)的强大优化,提高了深度学习应用中 I/O 操作的性能和效率。
要求
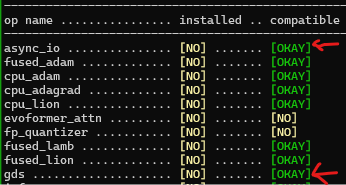
请确保您的环境已正确配置以使用 DeepNVMe。首先,您需要安装 DeepSpeed 版本 >= 0.15.0。接下来,请确保 DeepNVMe 操作符在 DeepSpeed 安装中可用。async_io 操作符是所有 DeepNVMe 功能所必需的,而 gds 操作符仅对 GDS 功能是必需的。您可以通过检查 ds_report 的输出来确认每个操作符的可用性,以确保兼容状态为 [OKAY]。以下是 ds_report 输出的片段,确认了 async_io 和 gds 操作符均可用。
如果 async_io 操作符不可用,您需要为您的 Linux 发行版安装相应的 libaio 库二进制文件。例如,Ubuntu 用户需要运行 apt install libaio-dev。通常,您应该仔细检查 ds_report 的输出以获取有用的提示,例如以下内容:
[WARNING]  async_io requires the dev libaio .so object and headers but these were not found.
[WARNING]  async_io: please install the libaio-dev package with apt
[WARNING]  If libaio is already installed (perhaps from source), try setting the CFLAGS and LDFLAGS environment variables to where it can be found.
要启用 gds 操作符,您需要通过查阅适用于裸机系统或 Azure VM(即将推出)的相应指南来安装 NVIDIA GDS。
创建 DeepNVMe 句柄
DeepNVMe 功能可以通过两种抽象来访问:aio_handle 和 gds_handle。aio_handle 适用于主机和设备张量,而 gds_handle 仅适用于 CUDA 张量,但效率更高。使用 DeepNVMe 的第一步是创建所需的句柄。aio_handle 需要 async_io 操作符,而 gds_handle 则需要 async_io 和 gds 两个操作符。以下代码片段分别演示了 aio_handle 和 gds_handle 的创建。
### Create aio_handle
from deepspeed.ops.op_builder import AsyncIOBuilder
aio_handle = AsyncIOBuilder().load().aio_handle()
### Create gds_handle
from deepspeed.ops.op_builder import GDSBuilder
gds_handle = GDSBuilder().load().gds_handle()
为简单起见,上述示例演示了使用默认参数创建句柄。我们期望使用默认参数创建的句柄在大多数环境中都能提供良好的性能。但是,您可以在下方查看高级句柄创建。
使用 DeepNVMe 句柄
aio_handle 和 gds_handle 提供了相同的 API,用于将张量存储到文件或从文件加载张量。这些 API 的共同特点是它们接受一个张量和一个文件路径作为所需 I/O 操作的参数。为获得最佳性能,应使用固定(pinned)的设备或主机张量进行 I/O 操作(详见此处)。为简洁起见,本教程将使用 aio_handle 进行说明,但请记住 gds_handle 的工作方式类似。
您可以在 Python shell 中通过对 aio_handle 对象进行 Tab 键补全来查看可用的 API。下面通过对 h. 进行 Tab 键补全进行演示。
>python
Python 3.10.12 (main, Jul 29 2024, 16:56:48) [GCC 11.4.0] on linux
Type "help", "copyright", "credits" or "license" for more information.
>>> from deepspeed.ops.op_builder import AsyncIOBuilder
>>> h = AsyncIOBuilder().load().aio_handle()
>>> h.
h.async_pread(             h.free_cpu_locked_tensor(  h.get_overlap_events(      h.get_single_submit(       h.new_cpu_locked_tensor(   h.pwrite(                  h.sync_pread(              h.wait(
h.async_pwrite(            h.get_block_size(          h.get_queue_depth(         h.get_intra_op_parallelism(        h.pread(                   h.read(                    h.sync_pwrite(             h.write(
用于执行 I/O 操作的 API 是那些名称中包含 pread 和 pwrite 子字符串的 API。为简洁起见,我们将重点介绍文件写入 API,即 sync_pwrite、async_pwrite 和 pwrite。我们将在下面仅讨论 sync_pwrite 和 async_pwrite,因为它们是 pwrite 的特化。
阻塞式文件写入
sync_pwrite 提供了 Python 文件写入的标准阻塞语义。下面的示例演示了如何使用 sync_pwrite 将一个 1GB 的 CUDA 张量存储到本地 NVMe 文件中。
>>> import os
>>> os.path.isfile('/local_nvme/test_1GB.pt')
False
>>> import torch
>>> t=torch.empty(1024**3, dtype=torch.uint8).cuda()
>>> from deepspeed.ops.op_builder import AsyncIOBuilder
>>> h = AsyncIOBuilder().load().aio_handle()
>>> h.sync_pwrite(t,'/local_nvme/test_1GB.pt')
>>> os.path.isfile('/local_nvme/test_1GB.pt')
True
>>> os.path.getsize('/local_nvme/test_1GB.pt')
1073741824
非阻塞式文件写入
DeepNVMe 的一个重要优化是非阻塞 I/O 语义,它使 Python 线程能够将计算与 I/O 操作重叠。async_pwrite 为文件写入提供了非阻塞语义。Python 线程随后可以使用 wait() 来与 I/O 操作同步。async_write 也可以用于提交多个连续的非阻塞 I/O 操作,然后可以使用单个 wait() 对它们进行阻塞。下面的示例演示了如何使用 async_pwrite 将一个 1GB 的 CUDA 张量存储到本地 NVMe 文件中。
>>> import os
>>> os.path.isfile('/local_nvme/test_1GB.pt')
False
>>> import torch
>>> t=torch.empty(1024**3, dtype=torch.uint8).cuda()
>>> from deepspeed.ops.op_builder import AsyncIOBuilder
>>> h = AsyncIOBuilder().load().aio_handle()
>>> h.async_pwrite(t,'/local_nvme/test_1GB.pt')
>>> h.wait()
1
>>> os.path.isfile('/local_nvme/test_1GB.pt')
True
>>> os.path.getsize('/local_nvme/test_1GB.pt')
1073741824
非阻塞 I/O 操作警告: 为避免数据竞争和损坏,必须谨慎使用 .wait() 来序列化源张量的写入和目标张量的读取。例如,在非阻塞文件写入期间对 t 进行以下更新是不安全的,并且可能损坏 /local_nvme/test_1GB.pt。
>>> t=torch.empty(1024**3, dtype=torch.uint8).cuda()
>>> from deepspeed.ops.op_builder import AsyncIOBuilder
>>> h = AsyncIOBuilder().load().aio_handle()
>>> h.async_pwrite(t,'/local_nvme/test_1GB.pt')
>>> t += 1 # <--- Data race; avoid by preceding with `h.wait()`
类似的安全问题也适用于在没有 .wait() 同步的情况下读取非阻塞文件读取的目标张量。
并行文件写入
DeepNVMe 的一个重要优化是能够并行化单个 I/O 操作。通过在构造 DeepNVMe 句柄时指定所需的并行度来启用此优化。使用该句柄的后续 I/O 操作将根据需要自动在请求数量的主机或设备线程上并行化。I/O 并行性可以与阻塞或非阻塞 I/O API 组合使用。下面的示例演示了使用 async_pwrite 进行 4 路并行文件写入。请注意,在句柄创建时使用了 intra_op_parallelism 参数来指定所需的并行度。
>>> import os
>>> os.path.isfile('/local_nvme/test_1GB.pt')
False
>>> import torch
>>> t=torch.empty(1024**3, dtype=torch.uint8).cuda()
>>> from deepspeed.ops.op_builder import AsyncIOBuilder
>>> h = AsyncIOBuilder().load().aio_handle(intra_op_parallelism=4)
>>> h.async_pwrite(t,'/local_nvme/test_1GB.pt')
>>> h.wait()
1
>>> os.path.isfile('/local_nvme/test_1GB.pt')
True
>>> os.path.getsize('/local_nvme/test_1GB.pt')
1073741824
固定张量
DeepNVMe 优化的一个关键部分是使用直接内存访问(DMA)进行 I/O 操作,这要求主机或设备张量是固定的(pinned)。要固定主机张量,您可以使用 Pytorch 或 DeepSpeed 加速器提供的机制。以下示例演示了将固定的 CPU 张量写入本地 NVMe 文件。
>>> import os
>>> os.path.isfile('/local_nvme/test_1GB.pt')
False
>>> import torch
>>> t=torch.empty(1024**3, dtype=torch.uint8).pin_memory()
>>> from deepspeed.ops.op_builder import AsyncIOBuilder
>>> h = AsyncIOBuilder().load().aio_handle()
>>> h.async_pwrite(t,'/local_nvme/test_1GB.pt')
>>> h.wait()
1
>>> os.path.isfile('/local_nvme/test_1GB.pt')
True
>>> os.path.getsize('/local_nvme/test_1GB.pt')
1073741824
另一方面,gds_handle 提供了 new_pinned_device_tensor() 和 pin_device_tensor() 函数用于固定 CUDA 张量。以下示例演示了将固定的 CUDA 张量写入本地 NVMe 文件。
>>> import os
>>> os.path.isfile('/local_nvme/test_1GB.pt')
False
>>> import torch
>>> t=torch.empty(1024**3, dtype=torch.uint8).cuda()
>>> from deepspeed.ops.op_builder import GDSBuilder
>>> h = GDSBuilder().load().gds_handle()
>>> h.pin_device_tensor(t)
>>> h.async_pwrite(t,'/local_nvme/test_1GB.pt')
>>> h.wait()
1
>>> os.path.isfile('/local_nvme/test_1GB.pt')
True
>>> os.path.getsize('/local_nvme/test_1GB.pt')
1073741824
>>> h.unpin_device_tensor(t)
整合
我们希望以上内容能帮助您开始使用 DeepNVMe。您还可以使用以下链接查看 DeepNVMe 在实际深度学习应用中的使用情况。
- 参数交换器在 ZeRO-Inference 和 ZeRO-Infinity 中。
- 优化器交换器在 ZeRO-Infinity 中。
- 梯度交换器在 ZeRO-Infinity 中。
- 简单的文件读写操作。
致谢
本教程在 王冠华、田中雅弘 和 Stas Bekman 的反馈下得到了显著改进。
附录
高级句柄创建
使用 DeepNVMe 实现峰值 I/O 性能需要仔细配置句柄创建。特别是,aio_handle 和 gds_handle 构造函数的参数对性能至关重要,因为它们决定了 DeepNVMe 与底层存储子系统(即 libaio、GDS、PCIe 和 SSD)交互的效率。为方便起见,我们允许使用默认参数值创建句柄,这在大多数情况下会提供不错的性能。但是,要在您的环境中榨取所有可用性能,可能需要调整构造函数参数,即 block_size、queue_depth、single_submit、overlap_events 和 intra_op_parallelism。aio_handle 构造函数参数和默认值如下所示:
>>> from deepspeed.ops.op_builder import AsyncIOBuilder
>>> help(AsyncIOBuilder().load().aio_handle())
Help on aio_handle in module async_io object:

class aio_handle(pybind11_builtins.pybind11_object)
 |  Method resolution order:
 |      aio_handle
 |      pybind11_builtins.pybind11_object
 |      builtins.object
 |
 |  Methods defined here:
 |
 |  __init__(...)
 |      __init__(self: async_io.aio_handle, block_size: int = 1048576, queue_depth: int = 128, single_submit: bool = False, overlap_events: bool = False, intra_op_parallelism: int = 1) -> None
 |
 |      AIO handle constructor
性能调优
如前所述,为特定工作负载或环境实现 DeepNVMe 的峰值性能需要使用优化配置的 aio_handle 或 gds_handle。为方便配置,我们提供了一个名为 ds_nvme_tune 的实用程序,可自动发现最佳 DeepNVMe 配置。ds_nvme_tune 会自动探索用户指定或默认的配置空间,并推荐提供最佳读写性能的选项。下面是 ds_nvme_tune 的一个使用示例,用于调整 GPU 内存和挂载在 /local_nvme 上的本地 NVMe SSD 之间的 aio_handle 数据传输。此示例使用了 ds_nvme_tune 的默认配置空间进行调优。
$ ds_nvme_tune --nvme_dir /local_nvme --gpu
Running DeepNVMe performance tuning on ['/local_nvme/']
Best performance (GB/sec): read =  3.69, write =  3.18
{
   "aio": {
      "single_submit": "false",
      "overlap_events": "true",
      "intra_op_parallelism": 8,
      "queue_depth": 32,
      "block_size": 1048576
   }
}
上述调优是在一台 Lambda 工作站上执行的,该工作站配备了两块 NVIDIA A6000-48GB GPU、252GB DRAM 和一块峰值读写速度分别为 5.6 GB/s 和 4.3 GB/s 的 CS3040 NVMe 2TB SSD。调优大约需要四分半钟。根据结果,通过使用如下配置的 aio_handle,可以预期读写传输速度分别达到 3.69 GB/秒和 3.18 GB/秒。
>>> from deepspeed.ops.op_builder import AsyncIOBuilder
>>> h = AsyncIOBuilder().load().aio_handle(block_size=1048576,
                                           queue_depth=32,
                                           single_submit=False,
                                           overlap_events=True,
                                           intra_op_parallelism=8)
ds_nvme_tune 的完整命令行选项可以通过常规的 -h 或 --help 获取。
usage: ds_nvme_tune [-h] --nvme_dir NVME_DIR [NVME_DIR ...] [--sweep_config SWEEP_CONFIG] [--no_read] [--no_write] [--io_size IO_SIZE] [--gpu] [--gds] [--flush_page_cache] [--log_dir LOG_DIR] [--loops LOOPS] [--verbose]

options:
  -h, --help            show this help message and exit
  --nvme_dir NVME_DIR [NVME_DIR ...]
                        Directory in which to perform I/O tests. A writeable directory on a NVMe device.
  --sweep_config SWEEP_CONFIG
                        Performance sweep configuration json file.
  --no_read             Disable read performance measurements.
  --no_write            Disable write performance measurements.
  --io_size IO_SIZE     Number of I/O bytes to read/write for performance measurements.
  --gpu                 Test tensor transfers between GPU device and NVME device.
  --gds                 Run the sweep over NVIDIA GPUDirectStorage operator
  --flush_page_cache    Page cache will not be flushed and reported read speeds may be higher than actual ***Requires sudo access***.
  --log_dir LOG_DIR     Output directory for performance log files. Default is ./_aio_bench_logs
  --loops LOOPS         Count of operation repetitions
  --verbose             Print debugging information.
DeepNVMe API
为方便起见,我们提供了 DeepNVMe API 的列表和简要说明。
通用 I/O API
以下函数用于 aio_handle 和 gds_handle 的 I/O 操作。
| 函数 | 描述 |
|---|---|
| async_pread | 非阻塞式文件读取到张量 |
| sync_pread | 阻塞式文件读取到张量 |
| pread | 带阻塞和非阻塞选项的文件读取 |
| async_pwrite | 非阻塞式文件从张量写入 |
| sync_pwrite | 阻塞式文件从张量写入 |
| pwrite | 带阻塞和非阻塞选项的文件写入 |
| wait | 等待非阻塞 I/O 操作完成 |
GDS 专用 API
以下函数仅适用于 gds_handle
| 函数 | 描述 |
|---|---|
| new_pinned_device_tensor | 分配并固定一个设备张量 |
| free_pinned_device_tensor | 解除固定并释放一个设备张量 |
| pin_device_tensor | 固定一个设备张量 |
| unpin_device_tensor | 解除固定一个设备张量 |
句柄设置 API
以下 API 可用于探测句柄配置。
| 函数 | 描述 |
|---|---|
| get_queue_depth | 返回队列深度设置 |
| get_single_submit | 返回是否启用 single_submit |
| get_intra_op_parallelism | 返回 I/O 并行度 |
| get_block_size | 返回 I/O 块大小设置 |
| get_overlap_events | 返回是否启用 overlap_event |